

A blog about building a Tom Turner car kiln.
Clay Studio

1st Bisque a Success!
First firing for Komainu!


First firing complete!
I unloaded the first firing in my new kiln! It fired like a Rolls Royce. The Big Bertha burners are incredibly powerful, and run smoooth! They are everything Tom says they are. The kiln was very responsive to any subtle changes made during the firing, which is key to having a kiln that works FOR you! I'm in the process of preparing for another bisque of my larger pieces, while glazing some smaller works for a cone 6 firing. Stay tuned for some pics of the process of loading my large lion dogs into the kiln. Even the thought of it makes me nervous!


Kiln Ceremony
In Japan, before each firing, many ceramists do a small Shinto ceremony for a successful firing. I have decided to continue this tradition - something I also did over the years living there. I placed a pile of salt, rice, a bottle of sake, a sprig of a green representing a Japanese plant called "Sagaki", (meaning tree of the Gods), as well as a clay kiln God. After placing these over the kiln, (where they will stay the duration of the firing, and be replaced with each firing), Tom Turner, a friend, Jacob Lions, and myself each took a small amount of salt, and threw it over the kiln, chimney and burners for purifying.
I'm not a religious person, but I do believe in ceremony. I enjoy it and also feel its significance. In this case, I actually couldn't imagine firing my kiln without doing this.
The photo hanging to the left is in honor of a friend of mine, John Ward, who was key in helping make this kiln possible. Although he's no longer here in body, I'm certain he's here in spirit. Thank you, John!


Loading for a first firing!
The time has finally arrived! I loaded my new kiln on 2/8/12 for a first firing. I made a bunch of smaller pots for this "test" firing. In loading, I realized how many pots this kiln can load. I always like to pack my kilns tight, especially for bisque, but hadn't made enough pots to do that, so it's "loosey goosey". At any rate, it's loaded and ready to take off!
What a treat being able to roll the door closed! Wow! I'll never get tired of doing that. (Except that it IS a heavy door).


What a treat being able to roll the door closed! Wow! I'll never get tired of doing that. (Except that it IS a heavy door).


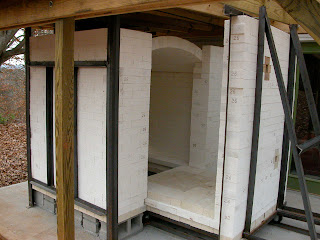
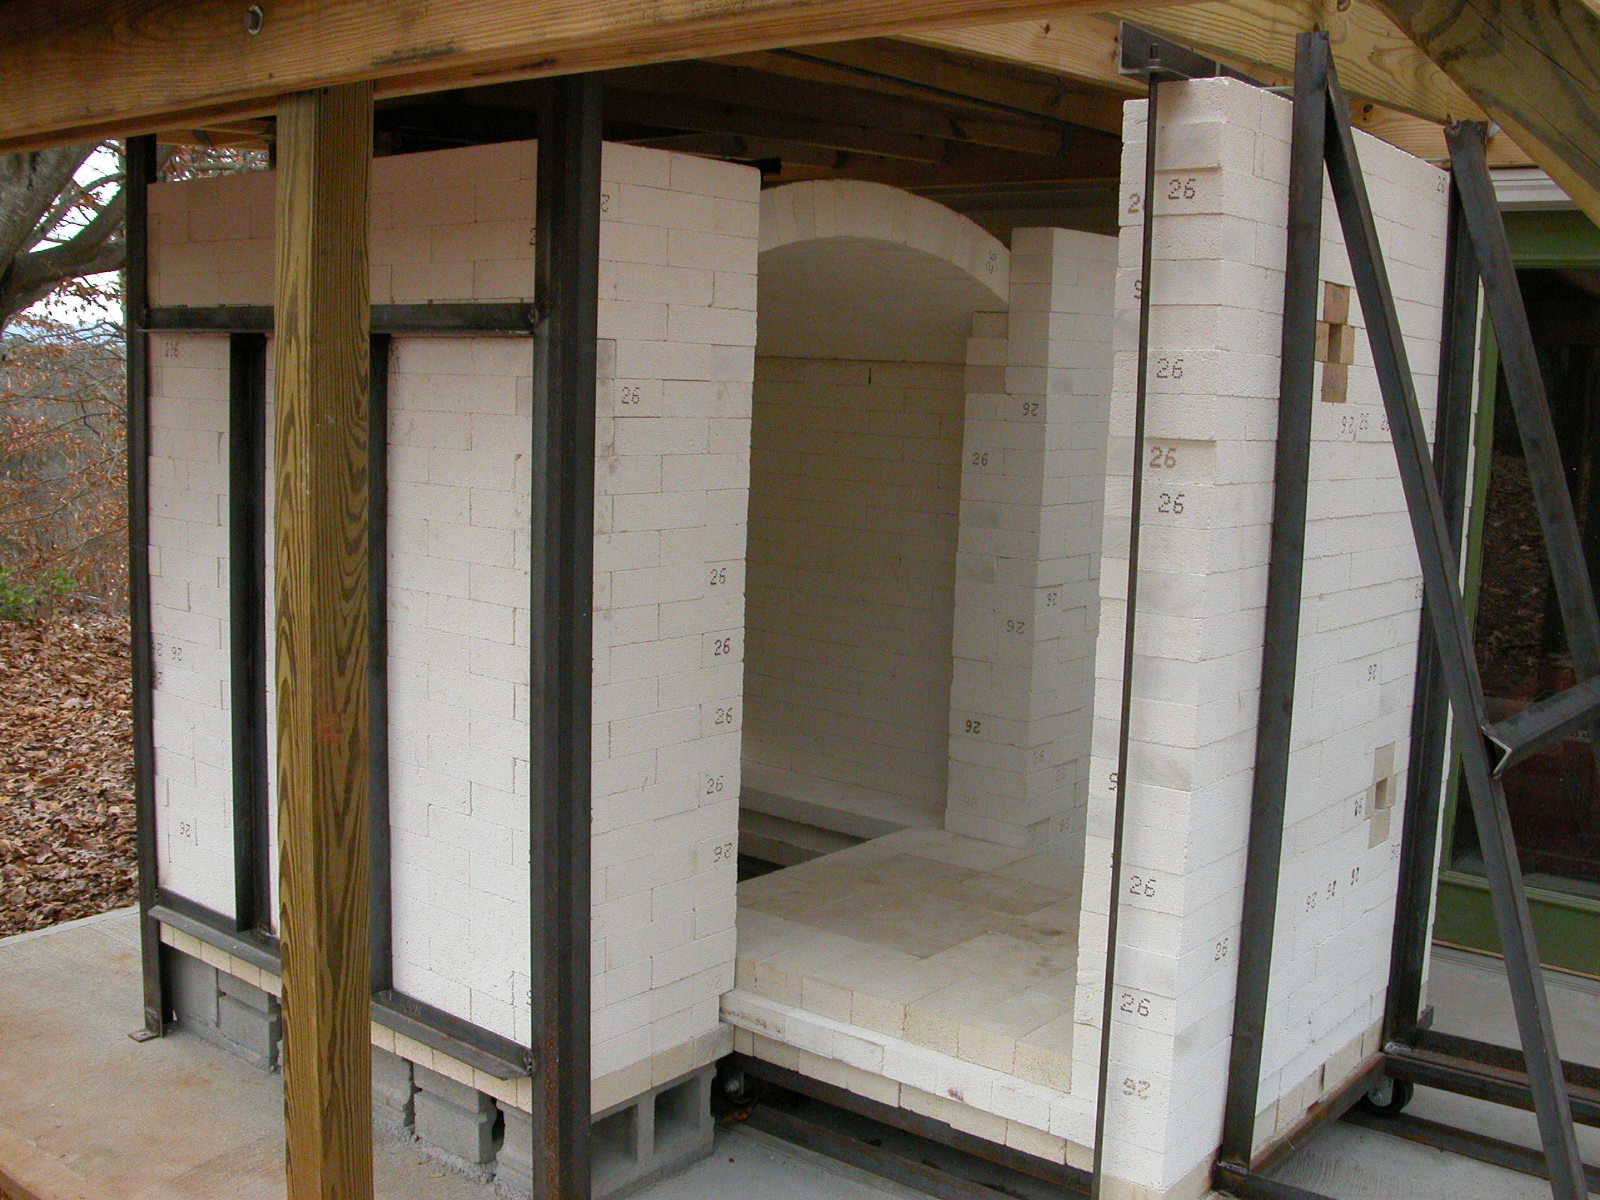
Construction is finished!
The construction of the kiln is finished! The arch is up and looks beautiful! Notice how tightly the door closes against the wall of the kiln. It really took some shaving of brick - a very vital step to having a tight seal for a safe, efficient firing.
The burner system is real simple. We used a pair of "Big Bertha" burners, black pipe, and a couple of gauges. Tom swears by these burners. Says they burn more efficient than any burners he's ever used - and he should know!
The last thing that needs to be done is to have the propane company come and hook up a pipe line from the propane tank to the union, with a 10 lb. regulator. I''ll be setting up an appointment to have that done this week.


 Right now, I"m making a bunch of smaller pieces to fill the kiln for the first firing. Hopefully, I'll then feel confident enough to fire the lion dogs in the next firing. Stay tuned!
The burner system is real simple. We used a pair of "Big Bertha" burners, black pipe, and a couple of gauges. Tom swears by these burners. Says they burn more efficient than any burners he's ever used - and he should know!
The last thing that needs to be done is to have the propane company come and hook up a pipe line from the propane tank to the union, with a 10 lb. regulator. I''ll be setting up an appointment to have that done this week.


Building the arch
Now that the roof is up, we can build the arch of the kiln. Tom had saved the beautiful arch form he built out of wood, a number of years ago when he built this kiln before.
First, we supported the arch form on top of 2 x 4's, then placed the bricks on top of the form, and worked from the outsides toward the center. The final, center row was the trickiest, as it needed to be a tight fit to be sure the bricks would maintain the arch shape once the form was dropped and pulled out.


 We then covered the top of the arch bricks with a thin layer of kaolin and sand, for extra seal. Next, the arch will come out.
First, we supported the arch form on top of 2 x 4's, then placed the bricks on top of the form, and worked from the outsides toward the center. The final, center row was the trickiest, as it needed to be a tight fit to be sure the bricks would maintain the arch shape once the form was dropped and pulled out.


Subscribe to:
Posts (Atom)